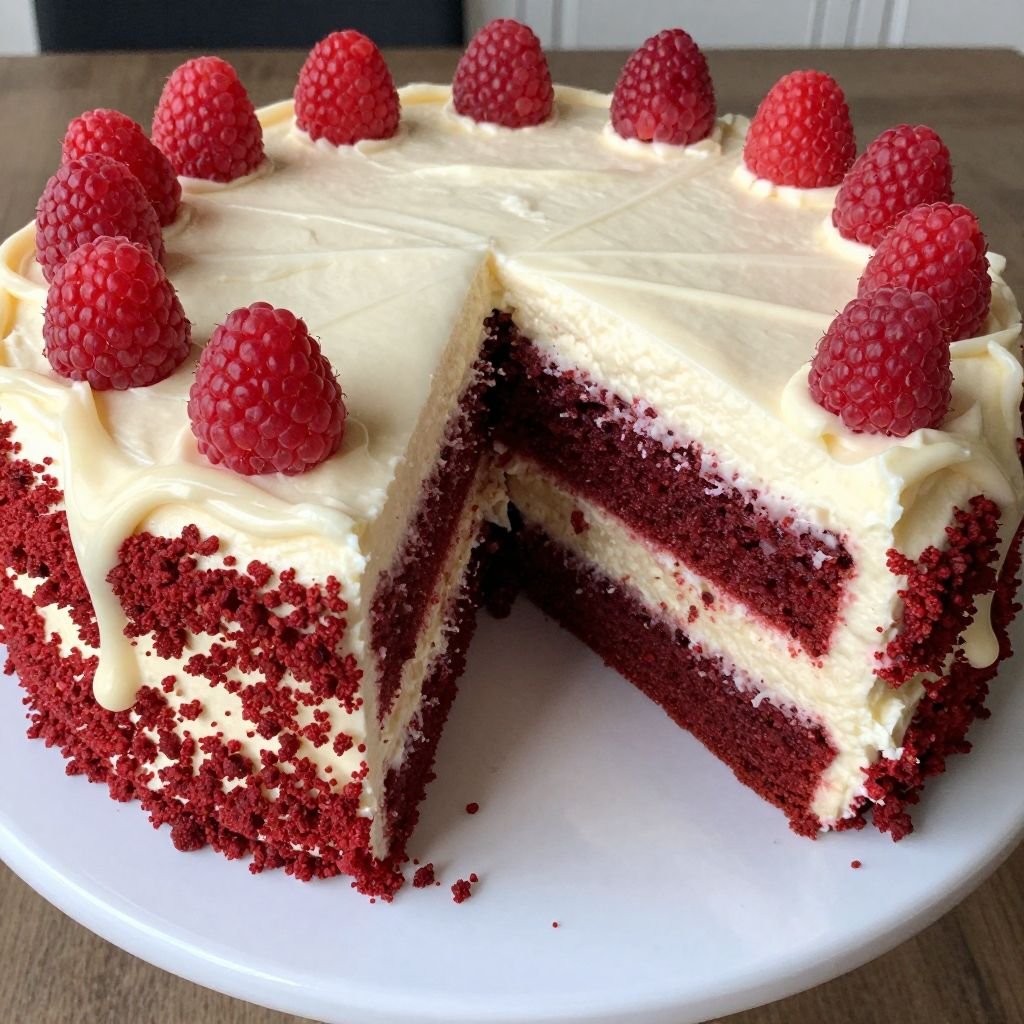
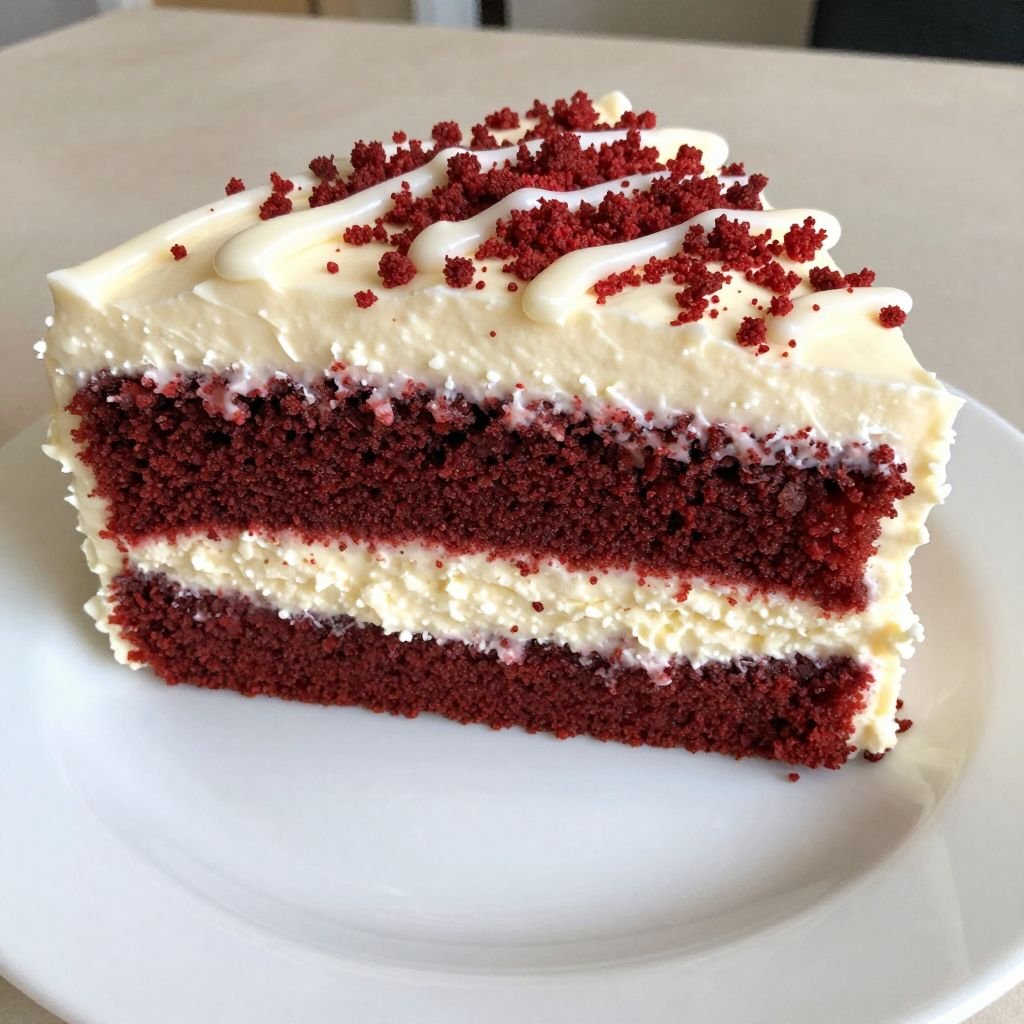
The first forkful of this cake is unforgettable — velvety crimson layers so tender they almost melt, tangled with clouds of tangy cream cheese frosting that balance every bite. This isn’t just another chocolate cake with food coloring; the buttermilk and cocoa create a subtle complexity that keeps people coming back for seconds. It’s the showstopper dessert that belongs at celebrations, yet surprisingly forgiving for home bakers ready to level up their cake game.
Why You’ll Love This Recipe
- Two 9-inch layers bake in just 30 minutes, giving you an impressive dessert without an all-day kitchen marathon
- The buttermilk-vinegar reaction creates an incredibly moist crumb that stays soft for days, making it perfect for advance prep
- Cream cheese frosting recipe yields exactly the right amount with zero waste — enough to fill, frost, and create beautiful swirls
- Room temperature ingredients mean no stand mixer required; you can mix this by hand and still get bakery-quality texture
- Striking red color and elegant presentation make guests think you ordered from a fancy bakery
Pro Tips
- Sift your dry ingredients twice to eliminate every cocoa lump — this single step is the secret to that signature velvety texture that gives the cake its name
- Bring eggs, buttermilk, and butter to room temperature before mixing; cold ingredients create a dense, heavy crumb instead of the light texture you want
- The vinegar-baking soda reaction happens fast, so have your pans ready before you mix the wet and dry ingredients together, then get the batter in the oven within 5 minutes
- For perfectly level layers that stack beautifully, weigh your batter and divide it evenly between pans — each pan should get about 450-480 grams
Classic Red Velvet Layer Cake
Ingredients
Method
- Preheat oven to 350°F (175°C). Grease and flour two 9-inch round cake pans, then line the bottoms with parchment paper circles.
- In a large bowl, sift together the flour, sugar, cocoa powder, baking soda, and salt twice to ensure no lumps remain.
- In a separate bowl, whisk together the eggs, oil, buttermilk, food coloring, vinegar, and vanilla extract until smooth and evenly combined.
- Pour the wet ingredients into the dry ingredients and stir gently with a wooden spoon just until combined and no flour streaks remain. Do not overmix.
- Divide the batter evenly between the prepared pans and bake for 28-32 minutes, until a toothpick inserted in the center comes out with just a few moist crumbs.
- Cool the cakes in the pans for 10 minutes, then turn out onto wire racks and cool completely before frosting, at least 1 hour.
- For the frosting, beat the cream cheese and butter together on medium speed until smooth and creamy, about 2 minutes.
- Add the powdered sugar one cup at a time, mixing on low speed after each addition, then add the vanilla and beat just until fluffy, about 30 seconds.
- Place one cake layer on a serving plate, spread with 3/4 cup frosting, top with the second layer, then frost the top and sides with the remaining frosting. Refrigerate for 30 minutes to set the frosting before slicing.
Frequently Asked Questions
Can I use natural cocoa powder instead of Dutch-process?
Yes, natural cocoa works perfectly here and actually enhances the reaction with the vinegar and baking soda. Dutch-process cocoa is already neutralized, so natural gives you better rise and more pronounced color.
How do I prevent my cream cheese frosting from being too soft?
Use full-fat cream cheese (not whipped or spreadable) at cool room temperature, and beat it minimally once you add the powdered sugar. Overbeating incorporates too much air and makes it loose. If it’s still soft, refrigerate for 15 minutes before frosting.
Why did my cake layers dome in the middle?
Your oven temperature is likely running hot. Use an oven thermometer to verify 350°F, and consider using cake strips soaked in cold water wrapped around your pans to insulate the edges and promote even baking.
How far ahead can I bake this cake?
Bake the layers up to 2 days ahead, wrap them tightly in plastic wrap while completely cool, and refrigerate. Frost the day of serving for best texture. You can also freeze unfrosted layers for up to 3 months.
Storage & Serving
Store this cake covered in the refrigerator for up to 5 days — the cream cheese frosting keeps it incredibly moist. Let it sit at room temperature for 30 minutes before serving so the frosting softens and the flavors bloom. Freeze individual slices wrapped in plastic and foil for up to 2 months; thaw overnight in the fridge for emergency dessert needs. Serve with fresh berries, a dusting of cocoa powder, or simply on its own with strong coffee to let those tangy-sweet layers shine.
This is the kind of cake that creates memories at birthday parties and holiday tables — one recipe you’ll return to again and again when only something truly special will do.